Create Sankey Diagrams and generate PHP code for your application
Sankey Diagrams are a type of diagram that shows flows and their quantities proportionally to one another. Dashboard Builder helps you to create Sankey diagrams with a drag and drop tool and a SQL engine with ease. Dashboard Builder generates PHP source code for you to use it anywhere in your application.
Requirements
- PHP Version 7.2 or later
- Apache 2 or later
- Windows 7 or later /Linux 3 or later
- Firefox 52, Chrome 57, IE 8
Installation
- Download from https://dashboardbuilder.net/download-free-dashboard
- Place the files in a directory on the web server. e.g.
…/www/dashboar/dbuilder/ - Unzip
 the file using Extract Here option to the root folder of "dashboardbuilder"
Create your first Sankey Diagrams
- Run the web folder in your browser. e.g. http://localhost/dashboardbuilder following welcome screen will appear
{dglb}images/php-dashboard-screen1.png|images/php-dashboard-screen1.png" width="60%" height="60%" style="display: block; margin-left: auto; margin-right: auto;|Welcome Screen|Group1{/dglb}
- Now Click the Database icon
- The following screen will appear. Select Database from data source tab. Select SQLite from the drop down list of Database, Enter your
"../data/Northwind.db"in the DB name field and Save changes as mentioned in the screen.
{dglb}images/php-dashboard-screen5.png|images/php-dashboard-screen5.png" width="40%" height="40%" style="display: block; margin-left: auto; margin-right: auto;| Select your Database|Group1{/dglb}
- A green tick mark with Database will appear when your database is successfully connected.
{dglb}images/php-dashboard-screen7.png|images/php-dashboard-screen7.png" style="display: block; margin-left: auto; margin-right: auto;| Dashboard Preferece|Group1{/dglb}
- Select the gear icon for your Dashboard preference.
{dglb}images/php-dashboard-screen8.png|images/php-dashboard-screen8.png" width="60%" height="60%" style="display: block; margin-left: auto; margin-right: auto;| Database Connected|Group1{/dglb}
- The following screen will appear. List of the tables will appear.
{dglb}images/php-dashboard-screen8b.png|images/php-dashboard-screen8b.png" width="60%" height="60%" style="display: block; margin-left: auto; margin-right: auto;| Chart Preference |Group1{/dglb}
- Enter your SQL statement in text box, SQL field as the following manner or just click on snakey tabel
SELECT * FROM sankey;
- Click the Run Query button
{dglb}images/sankey-dashboard-screen8.png|images/sankey-dashboard-screen8.png" width="60%" height="60%" style="display: block; margin-left: auto; margin-right: auto;| SQL Statement|Group1{/dglb}
- Query Result will appear. Now Select your x-axis data from the drop down list of X , y-axis data from the drop down list of Y , Value data the drop down list of Value and Text data from the drop down list of Text
- Select Sankey from the drop down list of Type
- Click Save Changes
{dglb}images/sankey-dashboard-screen9.png|images/sankey-dashboard-screen9.png" width="60%" height="60%" style="display: block; margin-left: auto; margin-right: auto;| SQL Query Result|Group1{/dglb}
- Charts will be appeared on the screen as shown below.
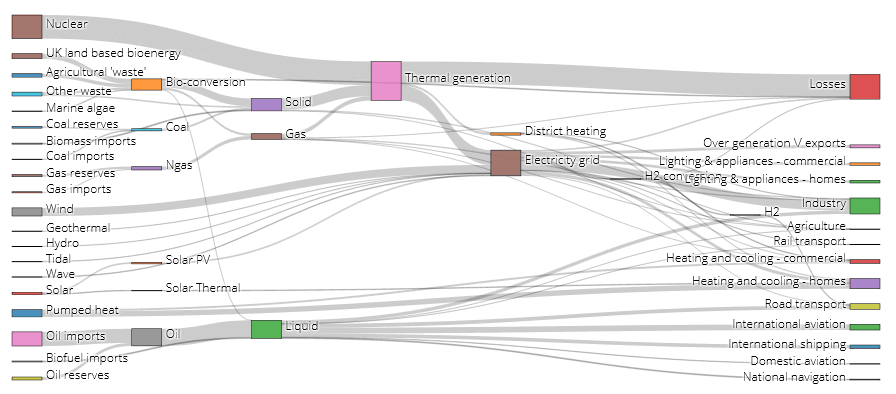
{dglb}images/sankey-dashboard-screen10.png|images/sankey-dashboard-screen10.png" width="60%" height="60%" style="display: block; margin-left: auto; margin-right: auto;| Sankey Diagrams |Group1{/dglb}
- Now extend the Generate button and click on the PHP Code
{dglb}images/php-dashboard-screen9c.png|images/php-dashboard-screen9c.png" style="display: block; margin-left: auto; margin-right: auto;| Chart Preference |Group1{/dglb}
- PHP code for the chart will automatically generate, you may copy past this code to your PHP application.
PHP Code
/**
 * DashboardBuilder
 *
 * @author Diginix Technologies www.diginixtech.com
 * Support  - http://www.dashboardbuilder.net
 * @copyright (C) 2018 Dashboardbuilder.net
 * @version 2.1.8
 * @license: license.txt
 */

include("inc/dashboard_dist.php");  // copy this file to inc folder


// for chart #1


$data = new dashboardbuilder();
$data->type =  "sankey";

$data->source =  "Database";
$data->rdbms =  "sqlite";
$data->servername =  "";
$data->username =  "";
$data->password =  "";
$data->dbname =  "../data/Northwind.db";
$data->xaxisSQL[0]=  "SELECT * FROM sankey;";
$data->xaxisCol[0]=  "X";
$data->yaxisSQL[0]=  "SELECT * FROM sankey;";
$data->yaxisCol[0]=  "Y";
$data->sizeSQL[0]=  "SELECT * FROM sankey;";
$data->sizeCol[0]=  "Value";
$data->textSQL[0]=  "SELECT * FROM sankey;";
$data->textCol[0]=  "TEXT";

$data->name = "0";
$data->title = "";
$data->orientation = "";
$data->xaxistitle = "";
$data->yaxistitle = "";
$data->showgrid = "";
$data->showline = "";
$data->height = "380";
$data->width = "";
$data->col = "0";

$result[0] = $data->result();?>


<!DOCTYPE html>
<html>
<head>
	<script src="assets/js/dashboard.min.js"></script> <!-- copy this file to assets/js folder -->
	<!--<link rel="stylesheet" href="assets/css/bootstrap.min.css"> Bootstrap CSS file, change the path accordingly -->


</head>
<body>

<div class="container">
<div class="col-lg-12">
<div class="panel panel-default">
<div class="panel-heading"></div>
    <div class="panel-body">
        <?php echo $result[0];?>
    </div>
</div>
</div>
</div>
</body>